¶ About Volumes
Volumes are a fundamental component of storage in our IaaS Cloud environment. Designed to offer scalable and flexible storage solutions, volumes provide users with the ability to attach additional storage capacity to their virtual machines as needed. In this section, we'll explore the concept of volumes in more detail, including their functionality, benefits and how to effectively utilize them within our cloud platform.
Generally, you can choose between these forms of volumes:
- Standard I/O - HDD: Standard I/O performance is typically achieved using Hard Disk Drives (HDDs), which offer substantial storage capacity at a lower cost but with slower read/write speeds.
- High I/O - SSD: High I/O performance is provided by Solid State Drives (SSDs), which offer faster data access and transfer speeds compared to HDDs, improving overall system responsiveness.
- Ultra-High I/O - NVMe: Ultra-High I/O performance is delivered by NVMe (Non-Volatile Memory Express) drives, which use the PCIe interface to achieve significantly faster data transfer rates than traditional SSDs.
- OS Root Disk - SSD: The OS root disk is commonly an SSD, providing the operating system with rapid boot times and swift access to system files, enhancing overall system performance.
¶ Creating Volumes
Before you begin, be aware that you can create your volume first and then the network or instance you want to attach it to, or you can start with the network and instance and create your storage afterward.
Creating a volume over the IaaS Cloud involves the following steps:
1. Navigate to Storage → Volumes on the left navigation bar.
2. Here, you can view all created volumes on your domain. To add a new volume, click on the Create volume button in the top row:

3. Then you have to specify the following parameters:
- Name of the disk volume.
- Zone of the volume.
- An appropriate Disk offering.
- Arbitrary Size of your volume.
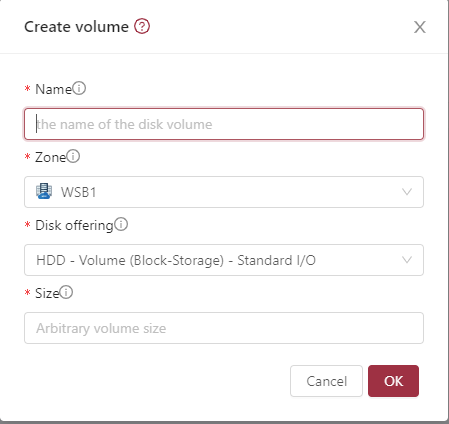
If you want to connect your volume to a network or an instance be careful to choose the same Zone in everyone of them.
5. Click OK to save and create your volume.
The status of your volume will be Allocated if it is successfully created and will change to Ready only when you attach it to a running VM.
¶ Uploading Volumes
Alternatively, you can upload a volume instead of creating one. For this process, you can choose to upload a volume from either a local source or a URL. Follow these steps to do so:
1. Navigate to Storage → Volumes on the left navigation bar.
2. To upload a new volume, click either on the Upload volume from local or Upload volume from URL button in the top row:

3. Here, you have to specify the following parameters:
- If you selected to upload from a local source, navigate to the folder or drag & drop the volume into the window. For a URL upload, just copy & paste the URL into the field.
- Give your volume a Name.
- Select a specific Zone.
- Format of your volume.
- An appropriate Disk offering.
- MD5 checksum value of your volume.
- Optionally, assign a specific Domain and Account to the volume.
5. Click OK to save and upload your volume.
If you want to upload a volume, be sure that it is within the available storage limit you selected.
¶ Working with Volumes
Navigating to Storage → Volumes gives you an overview of all created volumes in your IaaS Cloud environment. The list view provides a quick summary of all the important parameters of your volumes, such as Name, State, Size, Type, VM Name, Account, and Zone. Selecting a specific volume from the list redirects you to the detail view of that volume, which is divided into the action block (1.) on the top right, the information block (2.) on the left, and the management block (3.) on the right.

The action block appears in the first row and its functionality varies depending on whether the volume is attached or not. When the volume is attached, the action block looks like this:

- Detach disk: option to detach the volume from the current instance.
- Take snapshot: take a snapshot from the current volume; read more about that under Snapshots.
- Recurring snapshot: schedule a recurring snapshot.
- Resize volume: change size of your volume.
- Download volume: download current volume disk.
However, detach volumes offer different action opportunities, which are displayed in this block:

- Attach disk: attach volume to a instance.
- Resize volume: change size of your volume.
- Delete volume: remove volume from your environment.
Below the action block on the left column is the information summary of your volume. It shows details about Status, Size, Disk offering, Zone, Account, and Domain. Additionally, the last row give you the option to add some personal tags to your volume.
Next to the information block is the management block of your created volume, which offers various views and functionalities for your volume, divided into the following sections:
- Details: similar to the information block, it provides a quick summary of the most important configuration settings of your volume.
- Events: actions performed or scheduled by your volume.
- Comments: a simple channel for communication and notifications specific to an instance.
¶ Attaching Volumes
After creating a volume, you can attach it to any instance on your domain by following these steps:
1. Navigate to Storage → Volumes on the left navigation bar.
2. Select an allocated volume from the list view.
If a volume is in the Ready state, it is already attached to an instance. If you want to switch instances, you must detach it first and then proceed with the next steps.
3. Click on Attach disk in the top right action block:

4. First, choose the instance you want to attach the volume to by selecting the VM ID.
5. Optionally, assign a Device ID to map the volume to the guest OS. If no Device ID is informed, the next available ID will be chosen.
6. Finally, click on OK to attach the volume to the instance.
Once a volume is attached to a VM, you can reverse the process by detaching it using the Detach disk button in the detailed view of that specific volume.
¶ Taking snapshots
Once you have created a volume and attached it to a running instance, you can take a snapshot by following these steps:
1. Navigate to Storage → Volumes on the left navigation bar.
2. Select a volume from the list view.
3. Click on Take snapshot in the top right action block:

4. First, choose a Name for you snapshot.
5. Optionally, you can decide if the backup should be performed Async and give the snapshot Tags.
6. Finally, click on OK to save your settings and create a snapshot of your volume.
Once you created a snapshot of your volume, you find it under Storage → Snapshots. For more information skip to the chapter Snapshots.
¶ Recurring snapshots
Apart from standard snapshots, you can also schedule recurring snapshots. The name says it all: these are snapshots that repeat over a specified period of time. To schedule recurring snapshots, follow these steps:
1. Navigate to Storage → Volumes on the left navigation bar.
2. Select a volume from the list view.
3. Click on Recurring snapshots in the top right action block:

4. Here, you have to specify the Interval type, Time, and Timezone for your desired schedule. Additionally, select a number for Keep to specify the number of simultaneously saved snapshots.
5. Optionally, you give the snapshot Tags.
6. Click on OK to save and schedule your snapshot.
If you click on the Recurring snapshots button and switch to the Scheduled snapshots tab, you can see all scheduled snapshots of your volume and optionally delete unnecessary ones.
¶ Resizing Volumes
The initially selected disk size may not be sufficient after some time, or conversely, it may be too much. Our IaaS Cloud offers the option to adjust the capacity of your volume according to your needs. To change the size of your volume, following steps must be followed:
1. Navigate to Storage → Volumes on the left navigation bar.
2. Select a volume from the list view.
3. Click on Resize volume in the top right action block:

4. Specify the new Size of your disk and if you intend to reduce the space, check the Shrink OK toggle.
5. Click on OK to save your new volume size.
¶ Downloading Volumes
It is also possible to download your created volumes. To do so, follow these steps:
1. Navigate to Storage → Volumes on the left navigation bar.
2. Select a volume from the list view.
3. Click on Download volume in the top right action block:

4. In the pop-up window, click on OK. Shortly after, an individualized download link will appear in the notification center, from where you can download your volume.
¶ Creating Templates from Volumes
Finally, you can create templates from existing volumes as well. Follow these steps to do so:
Only volume types of ROOT can be turned into templates.
1. Navigate to Storage → Volumes on the left navigation bar.
2. Select a ROOT volume from the list view.
3. Click on Create template from volume in the top right action block:

4. Specify the following parameters:
- Name for the template.
- Short Description of the template.
- OS type that best represents this template.
- Choose Public if the template should be available to other users of the IaaS Cloud.
- Choose Featured if the template should be on the featured template list.
- Select Dynamically scalable if the template contains XS/VMWare tools in order to support dynamic scaling.
- Select HVM if the template requires hardware virtualized machines (HVM).
- Select Password enabled if the template supports the password reset feature.
5. Click on OK to save your settings and create the template.
You can find your created template under Images → Templates and can now utilize it in the creation process of a new instance.
¶ Deleting Volumes
To delete a volume, follow these steps:
1. Navigate to Storage → Volumes on the left navigation bar.
2. Select a specific volume from the list view.
3. Click on Delete volume in the right top action toolbar:

4. Click on OK to confirm and delete the volume.